Honeywell Thermostat Blank Screen: 5 Fixes That Work
Your Honeywell thermostat screen has gone blank. The heating or cooling has stopped. Before you call a technician, know this: a blank screen almost never means the thermostat is broken. In most cases, the fix takes less than 10 minutes and costs nothing.
This guide walks through every cause of a blank Honeywell thermostat screen, starting with the simplest checks and working through to the less common ones. It covers three specific situations that most other guides miss completely: a blank screen after a power outage, a screen that goes blank then comes back on, and how to reset your thermostat when you cannot see the display at all. The fixes apply to all three Honeywell Pro Series models: the T1 Pro, T4 Pro, and T6 Pro. Where the fix differs by model, that is clearly marked.
Work through the sections in order. Most readers fix the problem before reaching section four.
Why Is My Honeywell Thermostat Screen Blank?
A blank screen means the thermostat has lost power. The cause depends on your model. Start with the fix that matches your situation below.
- First: Find Out How Your Thermostat Gets Power
- Fix 1: Replace the Batteries (T1 Pro and T4 Pro)
- Fix 2: Check the C-Wire Connection (T6 Pro)
- Fix 3: Check System Power (All Models)
- Fix 4: Clear the Condensate Drain Line (All Models)
- Fix 5: Check the Control Board Fuse (All Models)
- Three Situations That Need a Different Approach
- When to Call a Technician
- Frequently Asked Questions
- Conclusion
First: Find Out How Your Thermostat Gets Power
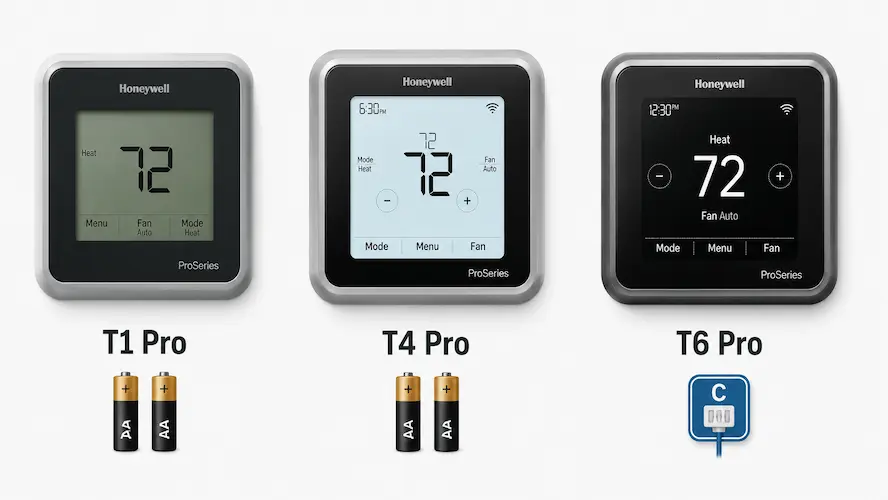
Before trying any fix, find out how your thermostat gets power. Some Honeywell Pro Series models run on 2 AA batteries. Others get continuous power from your HVAC system’s low-voltage control circuit through a C-wire. Using the wrong fix wastes time. Your model number appears on a sticker inside the battery compartment or on the back of the faceplate. On all three models, the thermostat faceplate must sit fully flush on the UWP wall plate to receive power correctly.
This guide covers standard 24V Honeywell thermostats. If your thermostat controls electric baseboard heating, these steps may not apply.
Honeywell T1 Pro: Battery-Powered Only
The T1 Pro runs on 2 AA alkaline batteries. Models TH1010D2000 and TH1110D2009 rely on batteries for the display and controls. The screen stays lit for only 8 seconds after a button press. If your T1 Pro screen is blank, start with Fix 1.
Honeywell T4 Pro: Battery-Powered Primary
Most T4 Pro installations use 2 AA alkaline batteries as the primary power source. Model TH4110U2005 can also accept a C-wire for AC power, but battery-only setups are common. Resideo’s official manual recommends replacing batteries every 12 months. If your T4 Pro screen is blank, start with Fix 1.
Honeywell T6 Pro: C-Wire Powered
The T6 Pro requires a continuous 24-volt AC supply through a C-wire. Models TH6220U2000 and TH6320U2008 cannot run on batteries alone. Unlike the T1 Pro and T4 Pro, even fresh batteries will not restore a blank T6 Pro screen if C-wire power is missing. The HVAC transformer converts household power into a 24-volt control circuit. The R wire carries that 24V to the thermostat, and the C-wire completes the circuit back. Batteries serve only as memory backup. Honeywell states the normal operating voltage at the R and C terminals is 20 to 30 VAC. If your T6 Pro screen is blank, skip Fix 1 and start with Fix 2.
| Model | Model Number | Primary Power | Batteries Power Display | Start With |
|---|---|---|---|---|
| T1 Pro | TH1010D2000 / TH1110D2009 | 2 AA batteries | Yes | Fix 1 |
| T4 Pro | TH4110U2005 | 2 AA batteries | Yes | Fix 1 |
| T6 Pro | TH6220U2000 / TH6320U2008 | C-wire (24V AC) | No — memory only | Fix 2 |
Fix 1: Replace the Batteries (T1 Pro and T4 Pro)
Dead batteries are the most common cause of a blank screen on the T1 Pro and T4 Pro. This fix applies to models TH1010D2000, TH1110D2009, and TH4110U2005.
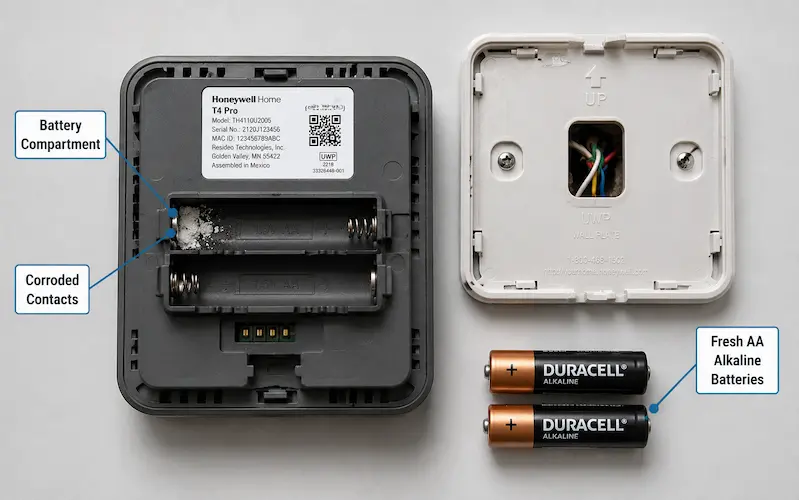
Set the thermostat to OFF using the mode button. Pull the faceplate straight off the UWP wall plate and open the battery compartment. Check the electrical contacts for white or green crusty residue—leaked battery acid blocks power even with fresh cells. Scrape residue away with a dry cotton swab. For stubborn deposits, apply white vinegar and dry completely before inserting new batteries.
Insert 2 fresh AA alkaline batteries matching the positive (+) and negative (-) markings. Use alkaline only. Rechargeable NiMH batteries operate at 1.2 volts per cell versus 1.5 volts for alkaline, which triggers low battery warnings or causes unreliable operation. Some T1 Pro and T4 Pro units show a low battery icon before the screen goes blank. Others fail without warning.
Push the faceplate back onto the UWP wall plate and press evenly on both outer corners until you hear a click. Even a small gap prevents the electrical contacts from connecting and leaves the screen blank.
If new batteries, clean contacts, and a flush fit do not restore the screen, the fault lies in the HVAC system. Move to Fix 3.
Fix 2: Check the C-Wire Connection (T6 Pro)
A blank T6 Pro screen usually means the thermostat is not receiving 24-volt AC power through the R and C wiring circuit. Do not replace batteries—on a T6 Pro, batteries do not power the display.
The low-voltage transformer inside the furnace or air handler supplies the 24V the T6 Pro needs. If either the R wire or C wire loses contact, the display goes blank immediately. Batteries serve only as memory backup and will not restore the screen if C-wire power is interrupted.
Turn off power at the HVAC breaker. Pull the faceplate off the UWP wall plate to expose the terminal block. Locate the C-wire, typically blue or black, and the R wire, typically red. Each wire must be fully inserted into its correct terminal slot with no insulation caught under the connection point. Confirm the C-wire is not accidentally inserted into a neighboring unused terminal—a common DIY installation mistake.
Tug each wire gently. A loose wire will slide or shift with light pressure. Signs of a poor connection include green-oxidized copper, bare copper outside the terminal slot, or frayed wire strands. Pull out any damaged wire, trim to clean copper, strip enough insulation to expose a clean conductor, and reinsert fully.
Also trace the C-wire to the furnace control board. The wire must be firmly connected to the C terminal there as well. A loose connection at the furnace end produces the same blank screen. If no C-wire exists, a technician can often repurpose an unused conductor inside the thermostat cable.
If a multimeter is available, measure AC voltage across the R and C terminals. A reading of 0 VAC confirms the power circuit is broken. If wiring looks secure at both ends but the screen remains blank, move to Fix 3.
Fix 3: Check System Power (All Models)
A blank thermostat screen after battery and wiring checks usually means the HVAC system has lost power. This fix applies to the T1 Pro, T4 Pro, and T6 Pro.
Go to your home’s electrical panel or breaker box. Find breakers labeled “Furnace,” “Air Handler,” “FAU,” or “AC.” A tripped breaker sits in the middle position, not fully ON or fully OFF. Push it firmly to OFF, wait 10 seconds, then push it to ON. Reset only once — if it trips again immediately, there is an active short circuit. Call a technician. Some systems have 2 separate breakers for the indoor and outdoor units. Check both to see if cooling has also stopped. Wait 60 seconds after resetting before checking the display.
Check the furnace power switch.
Most furnaces and air handlers have a dedicated power switch that looks identical to a standard light switch. It is easy to bump off during filter changes or cleaning. Locate it on the furnace cabinet or wall beside the air handler. If it was off, turn it on and wait 60 seconds before checking the display.
Why the Furnace Door Causes a Blank Screen
A furnace door that is not fully closed cuts 24-volt power to the thermostat. Most furnaces use a safety interlock switch, also called a blower door switch, behind the blower compartment access panel. When the panel closes fully, it completes the 120-volt circuit to the control board and transformer, which then supplies 24V to the thermostat. If the panel is slightly open, the transformer loses power and the screen goes blank. This commonly happens after a DIY filter change when retaining tabs are not fully engaged. Press the panel firmly until it sits flush. If the screen returns within 60 seconds, the blower door switch was the cause.
If breaker, furnace switch, and door checks do not restore the screen, move to Fix 4.
Fix 4: Clear the Condensate Drain Line (All Models)
A clogged condensate drain line triggers a safety float switch that cuts 24-volt power to the thermostat and leaves the screen blank. This occurs most often during summer when the air conditioner runs continuously.
Here is how the failure chain works:
- The condensate drain line clogs.
- Water collects in the evaporator drain pan.
- The float switch rises with the water level.
- The switch opens and cuts the R wire.
- The thermostat loses 24-volt power.
- The screen goes blank.
The float switch is intentionally wired in series with the R wire to stop the system and prevent water damage to ceilings, walls, and floors. Some installations use a condensate pump instead of a gravity drain—if the pump fails, the float switch shuts the system down the same way.
Check the evaporator drain pan beneath the indoor air handler. Standing water confirms the float switch has tripped. Also check the secondary drain pan—water there means the primary condensate drain has been blocked for some time.
Turn off power at the breaker. To clear the drain, attach a wet/dry vacuum to the exterior PVC drain outlet near the outdoor condenser, seal the connection with a rag or duct tape, and run it for 1 to 2 minutes. Alternatively, pour a quarter to half cup of distilled white vinegar into the T-shaped indoor cleanout port, wait 30 to 60 minutes, and then flush with a full gallon of warm water. Avoid bleach — many HVAC manufacturers recommend vinegar instead, as bleach may contribute to corrosion in some systems. Flush the drain line every 3 months during cooling season to prevent future blockages.
The float switch resets automatically once water drains. Restore power and wait 60 seconds. If the screen does not return, move to Fix 5.
Fix 5: Check the Control Board Fuse (All Models)
A blown control board fuse cuts all 24-volt power to the thermostat and leaves the screen blank. The fuse costs under $5 but must match the original rating exactly.
Turn off the HVAC breaker before opening any panels. Remove the furnace or air handler access panel to expose the control board. The fuse sits on the board surface near the low-voltage thermostat wire terminals—a small automotive-style blade fuse plugged into 2 metal terminals. It protects the HVAC low-voltage control circuit from overcurrent damage. Most fuses are color-coded: 3-amp fuses are typically violet or pink; 5-amp fuses are amber or orange. Always verify the rating printed on the fuse, board surface, or equipment documentation.
Never handle the fuse while power is on. Pull it from the fuse holder. A blown fuse shows a broken metal strip through the clear housing or black carbon scoring. Test with a multimeter in continuity mode—no tone or an OL reading confirms the fuse has blown.
Replace only with an automotive blade fuse of the exact same amperage. Never substitute wire, foil, or a higher-rated fuse — these bypass the safety circuit and pose a fire hazard. Installing a 5-amp fuse in place of a 3-amp fuse allows excess current that can destroy control board components, turning a $5 repair into a $300 to $900 board replacement.
Install the replacement fuse, then restore power. If the new fuse blows within seconds, an active short circuit exists. Do not install a third fuse. Common causes include a thermostat cable chafing against the furnace cabinet, a failed contactor coil, or incorrect DIY wiring. Call a licensed HVAC technician.
If the fuse is intact but the screen remains blank, measure voltage between the R and C terminals. A reading of 0 VAC means the thermostat is not receiving low-voltage power. The transformer, wiring, or another safety device may be interrupting the circuit—a technician must diagnose this.
Three Situations That Need a Different Approach
Some blank screen scenarios do not follow the Fix 1 through Fix 5 sequence. These 3 situations each have a distinct trigger that most troubleshooting guides miss.
Blank Screen After a Power Outage
After power returns, the HVAC breaker may have tripped or the control board fuse may have blown. Check both first using Fix 3 and Fix 5. If both are fine and the screen remains blank, turn the HVAC breaker OFF for 30 seconds before restoring power. This allows the system to restart cleanly. For T1 Pro and T4 Pro, remove both batteries and wait 2 minutes before reinstalling fresh AA alkaline cells to force a clean restart.
Screen Goes Blank Then Comes Back On
Intermittent blanking indicates power loss, not a failed thermostat. This symptom has 3 causes. A loose wire at the terminal block loses contact from vibration—remove the faceplate from the UWP wall plate and confirm every wire is fully inserted. A condensate float switch is cycling on and off from a partial drain blockage—clear the condensate drain line. The third and most serious cause is furnace overheating. When a clogged air filter or closed supply registers—the vents in floors, walls, or ceilings—restrict airflow, the bimetallic high-limit switch beside the heat exchanger interrupts the low-voltage control circuit. On some HVAC systems this blanks the screen. After 30 to 45 minutes of shutdown, the furnace cools, the switch closes, and the screen returns. This repeating cycle is a warning sign. Repeated overheating can damage the heat exchanger over time. Replace the air filter immediately and open all supply registers. If the pattern continues, call a technician.
How to Reset When You Cannot See the Screen
When the screen is completely blank, reset the power source rather than the thermostat menu. For T1 Pro and T4 Pro, remove both batteries and wait 2 minutes before reinstalling fresh AA alkaline batteries. Push the faceplate back until it clicks and wait 60 seconds. For the T6 Pro, flip the HVAC breaker OFF for 30 seconds, restore power, and wait 60 seconds. Some T6 Pro units start a setup sequence after a power interruption—the screen stays blank, but a date prompt and “Select” button appear at the bottom. Press the button beneath “Select” to return to the normal home screen. For full reset codes, see our Honeywell Pro Series Thermostat Manual guide.
When to Call a Technician
Stop troubleshooting and contact a licensed HVAC technician if any of these four situations apply.
The fuse blows again immediately—an active short circuit requires systematic multimeter testing across each thermostat wire. A burning smell is present — turn off the breaker immediately. Look for melted insulation on the R wire or C wire, burn marks on the low-voltage transformer, or charred areas on the control board. Do not restore power until a technician inspects the unit. A multimeter reads 0 VAC at R and C after all five fixes—the transformer or a safety device has permanently failed and must be replaced. The HVAC breaker trips again after reset—a locked compressor motor, grounded blower motor winding, or failed run capacitor requires professional diagnosis. None of these faults are DIY repairs.
Costs vary by location, system age, and labor rates in your area. The table below shows typical 2026 ranges based on HomeGuide data.
| Service | 2026 Cost Range |
|---|---|
| Standard diagnostic service call | $75 – $200 |
| Emergency or after-hours service | $100 – $300 |
| Condensate drain line clearing | $100 – $250 |
| Control board fuse swap with isolation test | $100 – $250 |
| IFC control board replacement | $300 – $900 |
| Standard thermostat replacement | $100 – $350 |
| Smart thermostat installation | $150 – $650 |
In most blank-screen cases, the thermostat itself is not broken. If you have worked through all five fixes and the three special situations without success, professional diagnosis is the safest and most cost-effective next step. Many residential furnaces include a 10-year limited parts warranty after registration, although coverage varies by manufacturer. Check your warranty before booking a service call.
Frequently Asked Questions
Conclusion
In conclusion, a blank Honeywell thermostat screen is almost always a power supply problem rather than a failed thermostat. The correct fix depends on whether the interruption comes from dead batteries, a disconnected C-wire, a tripped HVAC breaker, a safety device such as the condensate float switch, or a blown control board fuse. Working through each fix in order identifies the real cause and prevents unnecessary thermostat replacement.
Stop troubleshooting and call a licensed HVAC technician if a fuse blows again immediately after replacement, a burning smell is present, the breaker trips again after reset, or a multimeter confirms 0 VAC at the R and C terminals. In those situations, professional diagnosis is the safest and most cost-effective next step.
Still seeing a blank screen after working through every fix? Leave your thermostat model number and the checks you have already completed in the comments below. For model-specific wiring diagrams, ISU settings, and installation instructions, explore our [Honeywell T6 Pro Manual], [Honeywell T4 Pro Manual], and [Honeywell T1 Pro Manual]. For broader Honeywell troubleshooting beyond a blank screen, visit our [Honeywell Thermostat Not Working] guide.